Creating buttons for your website can sometimes be hard, but this tutorial will show you step by step an easy way to make buttons in
Adobe Photoshop that can be put together to create a navigation bar for your website, and when done should look a little some thing like:
Step 1: Create a New Image
Create a new image (Ctrl + N) with the dimension 500 x 500, like in the image here.
Step 2: The Background
Now you are going to want to fill the background with the colour
#575757.
.
Step 3: Add Noise to the Background
Now with the Background layer selected go to
Filter > Noise and put the settings as Amount 0.8%
Distribution: Gaussian, and Monochromatic Ticked, like in the image here.
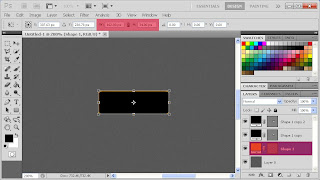
Step 4: Create the Button Shape
Now select the
Rounded Rectangle Tool and with a Radius of 4px, stroke off and fill with black, create a box of any size for the moment.
Step 5: Re-size the Box
You will need to press Ctrl + T now, to get the free transform tool up, and at the top re-size the box to Width: 100
px and Height: 32
px make sure you add
px to the end or it will not re-size it properly.
Step 6: Duplicate the Layer
Now that you have your button your are going to want to duplicate it so you have three of the same layers, to do this press Ctrl + J or drag the layer on to the new layer button.
Step 7: Re-size the Duplicated Layers
You are going to want to re-size the bottom layer to
Width: 102px and Height: 34px, also make sure you add px again, and change the colour, I changed it to an orange.
I also did the same for the top layer with the Width: 98px and Height: 30px, and changed the colour to a light blue.
Step 8: Adding a Layer Style
Now hide the top and bottom layer, so you only have the middle layer showing and add the
Layer Style Gradient Overlay.
Another
Layer Style I added was Stroke, I did a 1px stroke, on the inside. I put the Fill Type to Gradient and at an Angle of 45º.
So far your button should look like:
.
Step 9: Convert to Smart Object
Now un-hide the top layer and right click on it and select
Convert to Smart Object. It should now look like in the image.
Step 10: Contract Selection
After you converted the layer to a
Smart Object control and click on the layer to select the area, then go to
Select > Modify > Contract ...
Now only Contract it by 1pixel and press OK.
Now go to
Layer > Layer Mask > Hide Selection ... this will make you image have a small inner border.
Step 11: Adding a Gradient Overlay
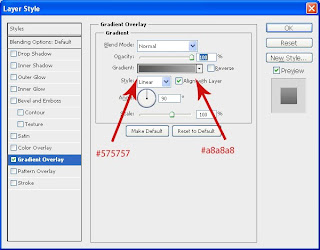 Now on the the same layer as before (the Blue one) go to layer styles and add a Gradient Overlay With these settings.
Once that is done, it should look like this.
Step 12: Adding Text
Now for the text, Select the
Text Tool, I used the font
Garamond Premier Pro Italic 18pt, With the colour #8e8e8e I typed my link on top of the button.
Now, to make the text look like it is embedded into the actual button, I duplicated the layer (Ctrl + J) and put it below the first one, I then changed the colour
to
#333333 and moved it 1px up.
That's how I made the button, to create more than one, put all the layers into a group (Except the background) and duplicate the group move it down a bit and edit the text.


 You are going to want to re-size the bottom layer to


 Now on the the same layer as before (the Blue one) go to layer styles and add a Gradient Overlay With these settings.


nice tutorial,really helped me out!
ReplyDeletecool I also have a tutorial/info blog check it out found though my profile
ReplyDeleteNice tutorial.
ReplyDeleteGreat tutorial!
ReplyDeleteCheers for that.
ReplyDeleteVery nice tutorial!
ReplyDeleteThis is rather helpfull :-)
ReplyDelete