For Part 1 of
Creating a Website Part 1 Click Here.
Part 2 explains how to create the
HTML and
CSS for the website that we created in part 1.
Step 1: Slicing the Image
For the first step just select the
Slice Select Tool (C), with this tool we are going to slice our website up to create all the different images.
Step 2: Start Slicing
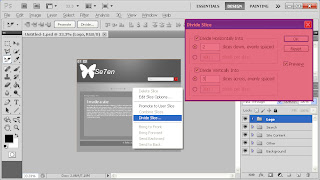 In this step just right click on your image and select Divide Slice... and a dialogue box will appear, put in the settings as shown here. This is the start of slicing your site.
Step 3: More Slicing
After you have pressed ok your image should look like this.
Now drag the lines so they start to fit your site, like I did here.
Step 4: More Slicing
Now keep dividing up your site by Right Clicking and selecting Divide Slice...
Make sure that everything that will be clicked is in its separate slice so that it can be made into a link.
Step 5: Saving the Image
Now to save the site (w/ CSS and HTML) go to File>Save for Web & Devices... That should bring up the Dialogue like this. Put the Format as HTML and Images.
Then put the Settings as
Other, which will bring up this dialogue.
 |
| Now enter these settings and click Ok. |
|
|
|
|
Now when you are done Click
save and you will have a folder with all the images and HTML and CSS ready to be uploaded to the internet.

 In this step just right click on your image and select Divide Slice... and a dialogue box will appear, put in the settings as shown here. This is the start of slicing your site.


Thanks for the tutorial.
ReplyDeleteDude, nice. I was just wondering earlier today how I could beef my blog up...
ReplyDeleteVery cool.
ReplyDeleteVery useful.
ReplyDeleteCool. Hit me up~
ReplyDeleteGood info.
ReplyDeletehttp://diaryof18.blogspot.com
ReplyDeleteI know you're just reading this and thinking 'oh, another generic link.'
And you'd be right. However mine is a generic link to a not so generic blog.
Thank you for taking the time to read this :D
Nice post btw :P